Shielded Dorman EGR pipe for 99-03 L36
 06-19-2006, 11:28 AM
#1
Senior Member
True Car Nut
Thread Starter

A method is described for installing a low-cost heat shield to protect a new Dorman upper intake manifold.
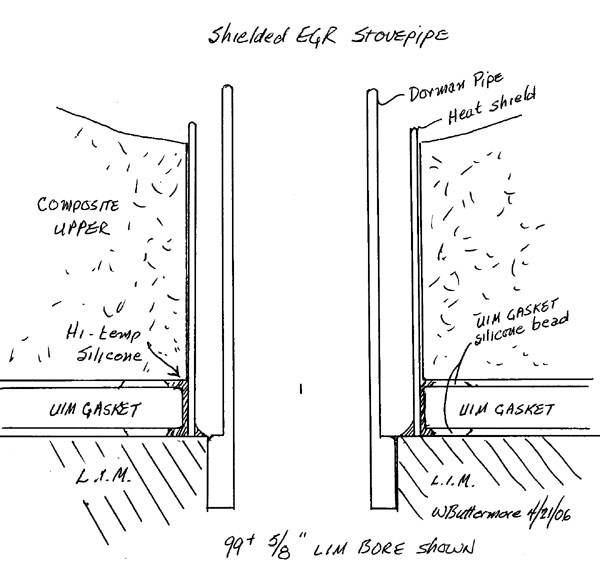
New Dorman upper intake manifold replacement kits (part no 615-180) come with a reduced diameter stovepipe that can be installed in place of the stock stovepipe in 99�03 L36 engines to increase the insulating air gap between the hot stovepipe and the vulnerable plastic bore of the upper intake manifold. Installing a thin-wall heat shield around the new stovepipe reduces the air gap compared to using the pipe with no heat shield but still provides a larger air gap than stock and more effectively protects the upper by reflecting and dissipating heat so that the plastic remains cool.
Advantages: Requires no cutting or machining of the new plastic UIM. Provides a heat-shield at a very low cost - $5 for the shield and $5 for the adhesive. Requires no special tools or skills. Shield can be removed and re-used if gaskets need to be changed. The shield is in contact with and cooled by the LIM. Can be retrofit to new Dorman uppers if the .510 stovepipe was installed.
Disadvantages: Not recommended for use with stovepipes larger than .510 inch. This modification requires time for the rtv silicone to cure extending the time needed to complete the repair.
At the current time, 95-98 L36 owners will need to adapt the new Dorman stovepipe to take advantage of this fix at an additional cost of $7 for a ring and bolt press, as described here: http://www.bonnevilleclub.com/forum/...ic.php?t=54769 . However, these owners can install a shield directly into the larger .750 bore of the LIM with no adhesive and no waiting time for set-up. (See how here: this post under construction) In the near future, Dorman will be providing a .750 x .510 pipe with their UIM replacement kits for 95-98 manifolds.
Materials
The heat shield is a piece of .750 seamless stainless steel thin-wall tubing 1.010 inch in length. The inside diameter of the tube is .710 which provides a .100 inch gap around the new .510 inch Dorman stovepipe. The 721 grade corrosion resistant stainless steel tubing can be purchased from McMaster Carr in Chicago for about $20 for a one-foot length.
A square cut is necessary to ensure full contact of the shield with the LIM while maintaining proper vertical alignment around the stovepipe. A mandrel is needed to cut the tubing with a tubing cutter to prevent the rollers and blade from reducing the tube diameter (swaging) as it is cut. If you don�t want to bother with buying and cutting your own, I will sell you a shield for $5 including postage. Send me a Personal Message at: http://www.bonnevilleclub.com/forum/...de=post&u=2199
if you want one.
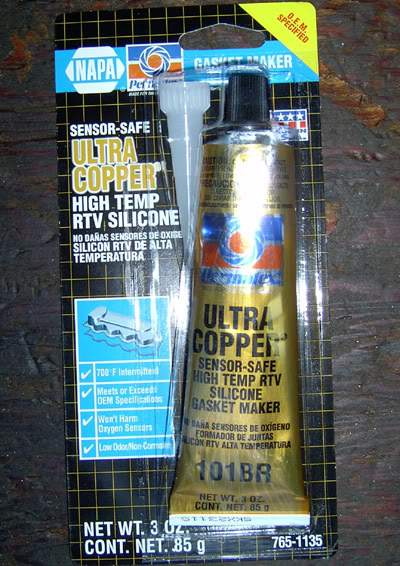
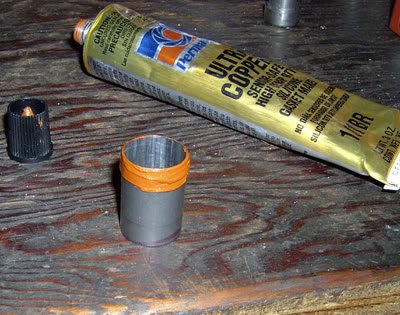
You will need a tube of Permatex Ultra copper high temperature rtv silicone. This adhesive has a temperature rating even higher than JB weld and forms a strong bond, but will allow removal of the shield if necessary.
Installation instructions. (Please read all instructions before you begin to work.)
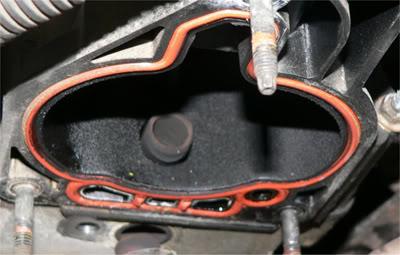
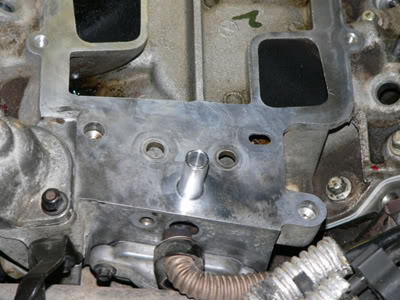
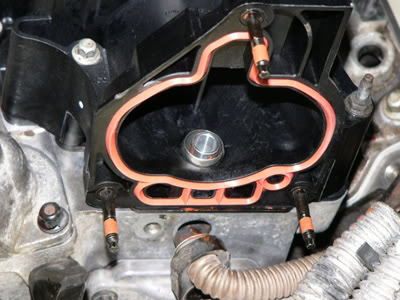
Before you remove your old upper, check the alignment of the stovepipe in the EGR bore. If the stock pipe is off-center in the bore, as Archon found in the image below, the shield will be also. If you find this condition, you may be able to adjust the position of the pipe a little by tapping it, or be able to move the shield a bit to compensate. The installation of a heat shield for the UIM is even more critical if the pipe is off-center, as heat will be concentrated in a small area of the UIM creating a failure-prone hot spot.
If the mis-alignment really bothers you, you can correct it by enlarging the bore around the stovepipe with hand tools and installing a custom-fit sleeve using the technique described in this post: http://www.bonnevilleclub.com/forum/...ic.php?t=33565
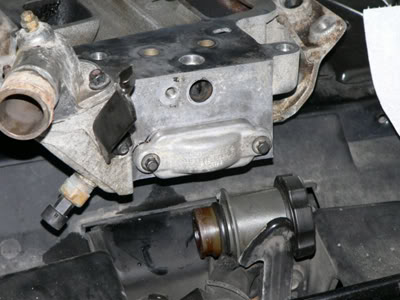
Remove the old stovepipe without crushing it by slipping a tight-fitting socket inside, then gripping and twisting with a pair of Vise-grips.

Carefully clean the stovepipe bore of carbon residue and oxidation. Clean and prepare the sealing surfaces of the LIM.
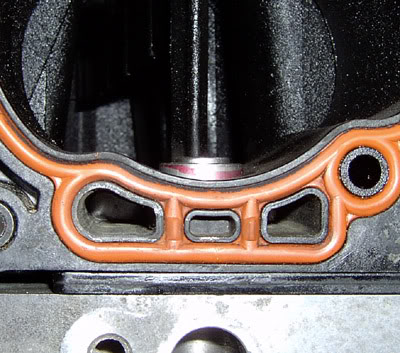
Install the Dorman pipe into the LIM.
Dry fit: Install the PCV tube (looks like a long bent straw) on the new gasket, then fit the tube and gasket onto the new upper, and set it in place on the LIM. Drop the shield around the pipe onto the LIM. You may have to wiggle the shield a bit to get it to drop through the hole in the gasket. Check the alignment of the pipe in the bore. You may be able to move the pipe a bit, if needed, by slipping a 3/8� bolt into the stovepipe and tapping the bolt. Install the two long bolts in the UIM near the throttle body and one at the other end near the PCV valve housing. You may be able to wiggle the UIM a bit on the bolts to improve the alignment if needed. Tighten the bolts to 89 inch-pounds. Observe the height of the shield above the surface of the EGR bore. The top of the shield should be below the top of the stovepipe. If not, the shield is not all the way down against the LIM. When you are sure the shield is correctly positioned, mark the top of the shield for reference on final assembly.
Assembly: Remove the bolts, and remove the UIM. Clean the plastic bore in the gasket with brake parts cleaner or alcohol, then rough up the plastic surface with sandpaper or emery. Roughen the surface of the shield where the silicone will be applied. Finish by cleaning again with solvent. Apply a layer of silicone in the gasket bore, and a bead around what will be the bottom of the shield as shown.
Insert the shield into the gasket hole; twist the shield back and forth to make sure you have no voids in the silicone. Leave a bit of the shield above the gasket. Wipe the excess silicone away.
Install the UIM on the LIM. Make alignment adjustments, moving the shield as needed before the silicone sets. Make sure the shield is down against the LIM. (Use the reference line marked on the top of the sleeve during the dry fit). Install the UIM bolts and torque them in sequence to 89 in-lb.
Allow the silicone to cure 24 hours at room temperature before firing the engine. The surface area of silicone holding the shield is small, but will anchor the shield strongly, if allowed to cure properly. I have tried this and torn it apart to make sure.
Option: If you have any doubts as to the ability of the silicone to hold the shield sufficiently against the gasket and the LIM, there is no reason why you could not clean and coat the bore of the UIM with silicone as well as the entire exterior of the shield and install it into the UIM as we would a sleeve.
Thanks to Gearhead Dick (Archon) for helping to brainstorm and troubleshoot this method, for doing the first installation in a �99 Grand Prix L36, for taking some excellent photographs, for proofreading this draft, and for providing moral support.
New Dorman upper intake manifold replacement kits (part no 615-180) come with a reduced diameter stovepipe that can be installed in place of the stock stovepipe in 99�03 L36 engines to increase the insulating air gap between the hot stovepipe and the vulnerable plastic bore of the upper intake manifold. Installing a thin-wall heat shield around the new stovepipe reduces the air gap compared to using the pipe with no heat shield but still provides a larger air gap than stock and more effectively protects the upper by reflecting and dissipating heat so that the plastic remains cool.
Advantages: Requires no cutting or machining of the new plastic UIM. Provides a heat-shield at a very low cost - $5 for the shield and $5 for the adhesive. Requires no special tools or skills. Shield can be removed and re-used if gaskets need to be changed. The shield is in contact with and cooled by the LIM. Can be retrofit to new Dorman uppers if the .510 stovepipe was installed.
Disadvantages: Not recommended for use with stovepipes larger than .510 inch. This modification requires time for the rtv silicone to cure extending the time needed to complete the repair.
At the current time, 95-98 L36 owners will need to adapt the new Dorman stovepipe to take advantage of this fix at an additional cost of $7 for a ring and bolt press, as described here: http://www.bonnevilleclub.com/forum/...ic.php?t=54769 . However, these owners can install a shield directly into the larger .750 bore of the LIM with no adhesive and no waiting time for set-up. (See how here: this post under construction) In the near future, Dorman will be providing a .750 x .510 pipe with their UIM replacement kits for 95-98 manifolds.
Materials
The heat shield is a piece of .750 seamless stainless steel thin-wall tubing 1.010 inch in length. The inside diameter of the tube is .710 which provides a .100 inch gap around the new .510 inch Dorman stovepipe. The 721 grade corrosion resistant stainless steel tubing can be purchased from McMaster Carr in Chicago for about $20 for a one-foot length.
A square cut is necessary to ensure full contact of the shield with the LIM while maintaining proper vertical alignment around the stovepipe. A mandrel is needed to cut the tubing with a tubing cutter to prevent the rollers and blade from reducing the tube diameter (swaging) as it is cut. If you don�t want to bother with buying and cutting your own, I will sell you a shield for $5 including postage. Send me a Personal Message at: http://www.bonnevilleclub.com/forum/...de=post&u=2199
if you want one.
You will need a tube of Permatex Ultra copper high temperature rtv silicone. This adhesive has a temperature rating even higher than JB weld and forms a strong bond, but will allow removal of the shield if necessary.
Installation instructions. (Please read all instructions before you begin to work.)
Before you remove your old upper, check the alignment of the stovepipe in the EGR bore. If the stock pipe is off-center in the bore, as Archon found in the image below, the shield will be also. If you find this condition, you may be able to adjust the position of the pipe a little by tapping it, or be able to move the shield a bit to compensate. The installation of a heat shield for the UIM is even more critical if the pipe is off-center, as heat will be concentrated in a small area of the UIM creating a failure-prone hot spot.
If the mis-alignment really bothers you, you can correct it by enlarging the bore around the stovepipe with hand tools and installing a custom-fit sleeve using the technique described in this post: http://www.bonnevilleclub.com/forum/...ic.php?t=33565
Remove the old stovepipe without crushing it by slipping a tight-fitting socket inside, then gripping and twisting with a pair of Vise-grips.
Carefully clean the stovepipe bore of carbon residue and oxidation. Clean and prepare the sealing surfaces of the LIM.
Install the Dorman pipe into the LIM.
Dry fit: Install the PCV tube (looks like a long bent straw) on the new gasket, then fit the tube and gasket onto the new upper, and set it in place on the LIM. Drop the shield around the pipe onto the LIM. You may have to wiggle the shield a bit to get it to drop through the hole in the gasket. Check the alignment of the pipe in the bore. You may be able to move the pipe a bit, if needed, by slipping a 3/8� bolt into the stovepipe and tapping the bolt. Install the two long bolts in the UIM near the throttle body and one at the other end near the PCV valve housing. You may be able to wiggle the UIM a bit on the bolts to improve the alignment if needed. Tighten the bolts to 89 inch-pounds. Observe the height of the shield above the surface of the EGR bore. The top of the shield should be below the top of the stovepipe. If not, the shield is not all the way down against the LIM. When you are sure the shield is correctly positioned, mark the top of the shield for reference on final assembly.
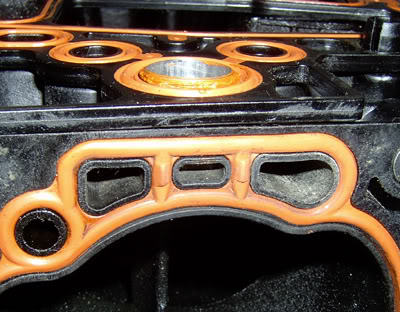
Assembly: Remove the bolts, and remove the UIM. Clean the plastic bore in the gasket with brake parts cleaner or alcohol, then rough up the plastic surface with sandpaper or emery. Roughen the surface of the shield where the silicone will be applied. Finish by cleaning again with solvent. Apply a layer of silicone in the gasket bore, and a bead around what will be the bottom of the shield as shown.
Insert the shield into the gasket hole; twist the shield back and forth to make sure you have no voids in the silicone. Leave a bit of the shield above the gasket. Wipe the excess silicone away.
Install the UIM on the LIM. Make alignment adjustments, moving the shield as needed before the silicone sets. Make sure the shield is down against the LIM. (Use the reference line marked on the top of the sleeve during the dry fit). Install the UIM bolts and torque them in sequence to 89 in-lb.
Allow the silicone to cure 24 hours at room temperature before firing the engine. The surface area of silicone holding the shield is small, but will anchor the shield strongly, if allowed to cure properly. I have tried this and torn it apart to make sure.
Option: If you have any doubts as to the ability of the silicone to hold the shield sufficiently against the gasket and the LIM, there is no reason why you could not clean and coat the bore of the UIM with silicone as well as the entire exterior of the shield and install it into the UIM as we would a sleeve.
Thanks to Gearhead Dick (Archon) for helping to brainstorm and troubleshoot this method, for doing the first installation in a �99 Grand Prix L36, for taking some excellent photographs, for proofreading this draft, and for providing moral support.
 04-09-2007, 10:00 PM
#2
Member
Posts like a V-Tak

Join Date: Feb 2007
Posts: 42
Likes: 0
Received 0 Likes
on
0 Posts

Is there any difference from a 1997 LIM and a 2001 LIM other than the stove pipe size? The motor that I am pulling is the 2001 and it has the 5/8 in stove pipe. I donor I am using is a 1997 with the 3/4 pipe. I want to use the LIM from the 2001 motor which is blown, becasue of the smaller stove pipe on the 1997 engine. Everything looks the same. I also want to purchase a 3/4 in shield and reduce the stove pipe to 1/2 in. I think Bill has these parts?? thanks
04-18-2007, 11:24 PM
#4
Senior Member
True Car Nut
Thread Starter
Originally Posted by mdrose64
I have a question about the UIM shield, Can I use JB Weld on the entire length of the 3/4 in shield for strength or does the silicone insulate better?
And to answer the previous question, I don't know of any other differences between the older and newer LIMs except for the stovepipe. GM used to replace them just to give folks the smaller pipe.
04-19-2007, 12:18 PM
#5
Senior Member
Certified GM nut

Had a friend of mine turn a stainless .500 reduced dia lower pipe that I plan to install. I then will remove the original .750 dia pipe that is touching the plastic and cut it to 1" length and use it for a shield. Only question is to use JB or silicone. Maybe I'll bend a few ears at the bottom to ensure it won't pop up.
Nedd ambition though. She'* running sweet.
Nedd ambition though. She'* running sweet.
04-19-2007, 12:25 PM
#6
Senior Member
True Car Nut

Mine'* running like a top too. That'* why I haven't done anything yet with all the parts I have lying around just waiting for me to do this
Mine new OEM manifold will get the whole nine yards of the Dillon/Buttermore fix at that time.
Mine new OEM manifold will get the whole nine yards of the Dillon/Buttermore fix at that time.

Thread
Thread Starter
Forum
Replies
Last Post
bill buttermore
1992-1999
9
02-13-2007 11:00 AM

