Fan Override
 07-27-2005, 10:50 PM
#1
DINOSAURUS BOOSTUS


Expert Gearhead
Thread Starter

Yes, Willwren posted a lot of information about an override on his 93 and many built upon it. However many have asked lately how do you go about doing this mod. I took some time and beers out tonight and did the mod w/tons of pics for your reading pleasure.
Project time about 45 minutes, Project dfficulty 4 beers, Project hold ups: finding cutoff wheel for dremel tool
Ok, there'* a few things we need for the project before we start.
1. Wire (approximately 6 feet
2. Switch
3. Connection method (I soldered and heat shrink tubed)
4. Wire coat hanger
5. Electrical tape
6. Beer
Depending on switch location you need more wire or special cutting tools.
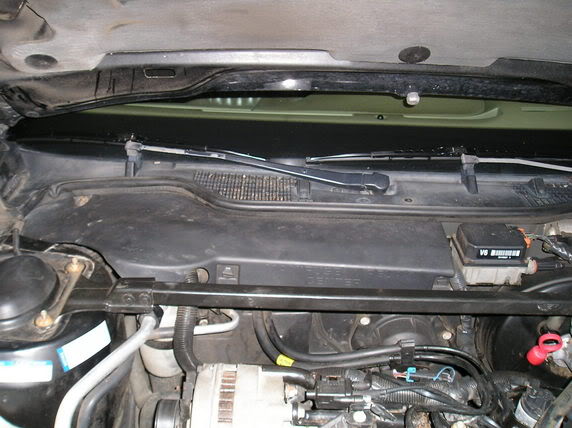
I started off deciding where to run the wire. Willwren used an existing tranny temp grommet that is an add on by him. I wanted something that wouldn't leak and was existing for all. I chose (thanks Cfoote) the hood release cable grommet

Then take and cut the end off the coat hanger, and gently feed it through up against the cable. Don't use excessive force. It should go pretty easy. Lucky for us, my coat hanger was white.
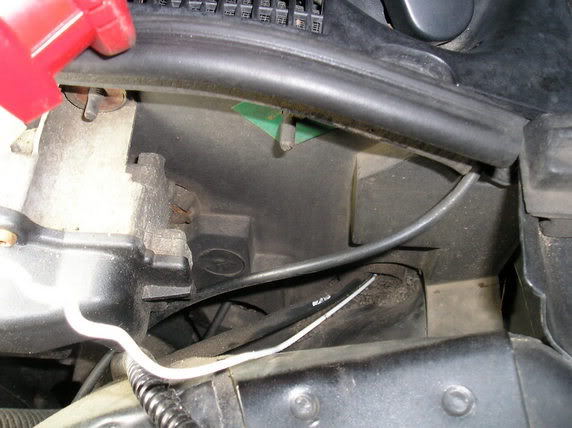
Pushed about 18 inches into the grommet and decide to go look in the car. I got lucky the hush panel didn't need to get moved to find the hanger. (I dropped the panel to route the wire)

You then bend the hanger sharply and tie the wire onto it.
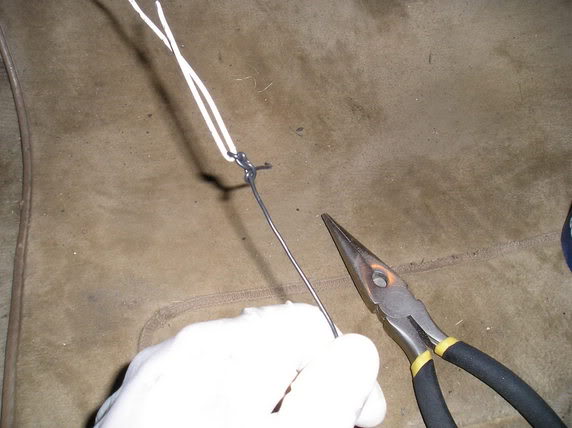
Electrical tape over it to ensure it doesn't catch on anything
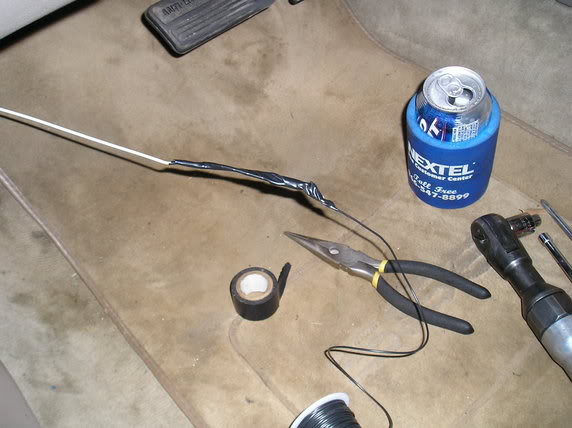
Go to under hood and gently and slowly guide the coat hanger back. You should get a hanger and a wire. I got it first try. (ps..I've run wires like this before)
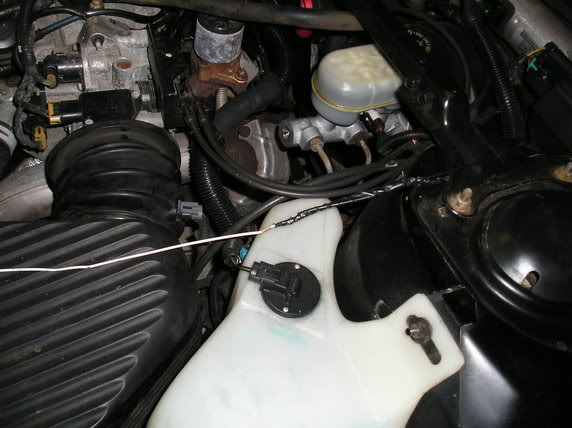
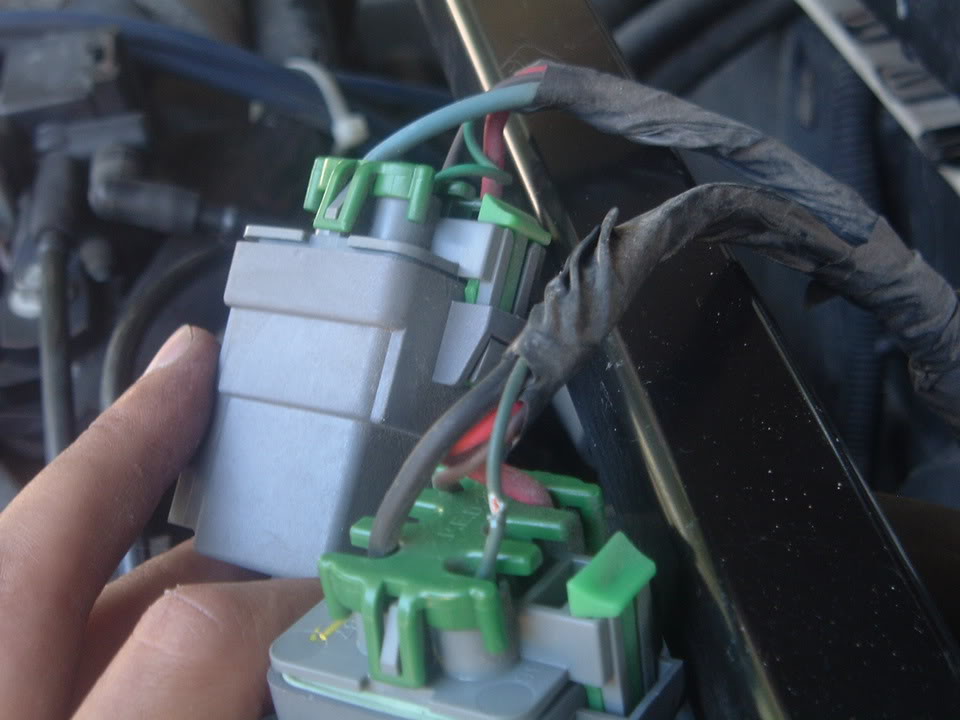
Then refer to FSM for relay positioning and do not take anything for granted. Check wire colors with FSM.
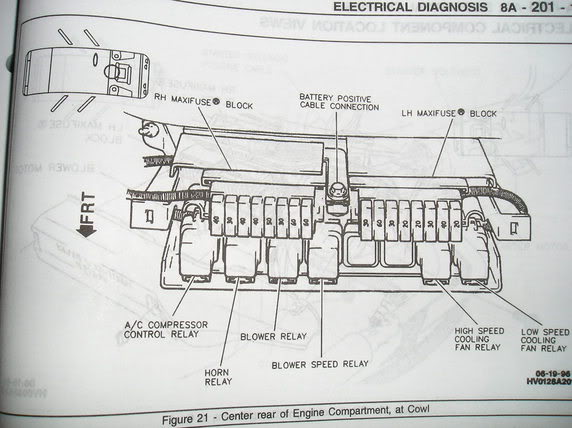
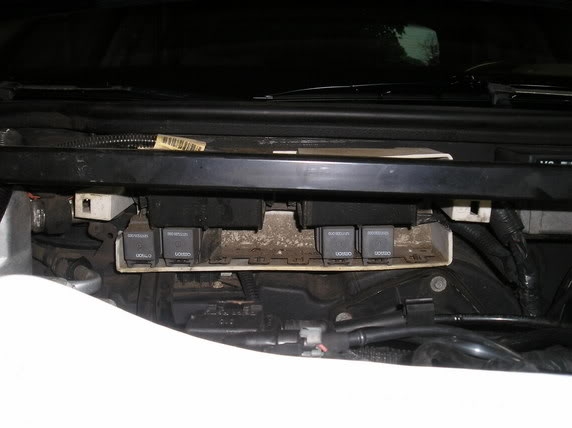
Compare your maxifuse relay center area to FSM and remember you don't have 2 blower relays because you have ECC.
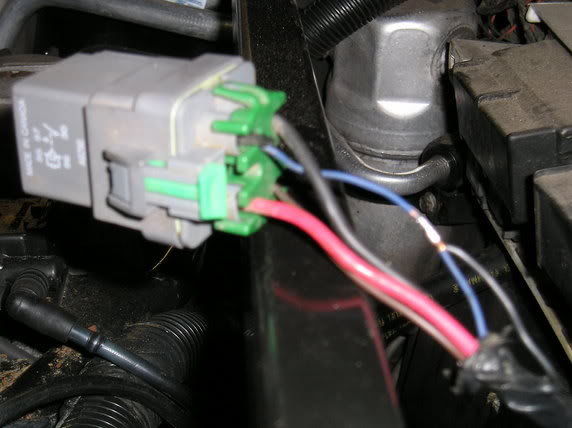
Using a small screwdriver push down on the tab holding the relays into the center and release both high and low speed. We are checking wire color and adding a wire. In my case the ground from the PCM to high speed relay is a blue wire. That is the wire I needed to tap into. With any project you should test first. Yes, I saw ground with the A/C on, and nothing with it off. This is my wire. I then ran a short piece of wire and grounded it. Yes, success.

Solder my newly run wire onto it. Then electrical taped very well to seal it.
Ok..done out here, but just in case...don't button anything up. I put the relays back into the center and went inside the car.
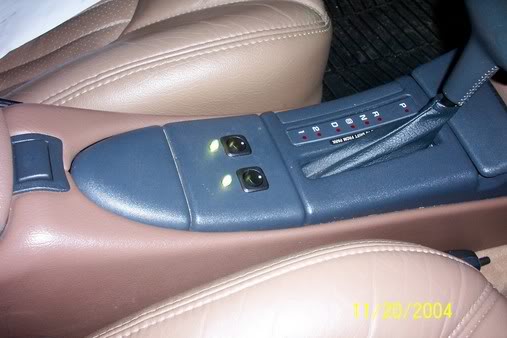
With my spool of wire still in tact I chose my switch location and wired my switch to test it. (I found a nice ground under the center console.)
Tested my switch before cutting anything. Yes, works good. Then I cut and mounted my switch.

I wanted a non obvious spot and happed to use a fog light switch I picked up at a junkyard. And here it is again in the side of my console.

Tested again and it works good. Time to go put the maxifuse cover back on and close the hood.
Project done.
Project time about 45 minutes, Project dfficulty 4 beers, Project hold ups: finding cutoff wheel for dremel tool
Ok, there'* a few things we need for the project before we start.
1. Wire (approximately 6 feet
2. Switch
3. Connection method (I soldered and heat shrink tubed)
4. Wire coat hanger
5. Electrical tape
6. Beer
Depending on switch location you need more wire or special cutting tools.
I started off deciding where to run the wire. Willwren used an existing tranny temp grommet that is an add on by him. I wanted something that wouldn't leak and was existing for all. I chose (thanks Cfoote) the hood release cable grommet
Then take and cut the end off the coat hanger, and gently feed it through up against the cable. Don't use excessive force. It should go pretty easy. Lucky for us, my coat hanger was white.
Pushed about 18 inches into the grommet and decide to go look in the car. I got lucky the hush panel didn't need to get moved to find the hanger. (I dropped the panel to route the wire)
You then bend the hanger sharply and tie the wire onto it.
Electrical tape over it to ensure it doesn't catch on anything
Go to under hood and gently and slowly guide the coat hanger back. You should get a hanger and a wire. I got it first try. (ps..I've run wires like this before)
Then refer to FSM for relay positioning and do not take anything for granted. Check wire colors with FSM.
Compare your maxifuse relay center area to FSM and remember you don't have 2 blower relays because you have ECC.
Using a small screwdriver push down on the tab holding the relays into the center and release both high and low speed. We are checking wire color and adding a wire. In my case the ground from the PCM to high speed relay is a blue wire. That is the wire I needed to tap into. With any project you should test first. Yes, I saw ground with the A/C on, and nothing with it off. This is my wire. I then ran a short piece of wire and grounded it. Yes, success.
Solder my newly run wire onto it. Then electrical taped very well to seal it.
Ok..done out here, but just in case...don't button anything up. I put the relays back into the center and went inside the car.
With my spool of wire still in tact I chose my switch location and wired my switch to test it. (I found a nice ground under the center console.)
Tested my switch before cutting anything. Yes, works good. Then I cut and mounted my switch.
I wanted a non obvious spot and happed to use a fog light switch I picked up at a junkyard. And here it is again in the side of my console.
Tested again and it works good. Time to go put the maxifuse cover back on and close the hood.
Project done.
 07-27-2005, 11:28 PM
#3
Senior Member
Certified GM nut

Join Date: Feb 2004
Location: MI
Posts: 2,246
Likes: 0
Received 0 Likes
on
0 Posts

I am very interested in this. I do not like how my car creeps up there as I sit at stop lights. I complain to PJ every time she is with me  (its true). This would probably take me about half the time because I already have a wire going through the firewall that I had going to neons (until I fried them
  ). Plus everytime someone gets in my car they see my switches (below) and ask what they are. I get sick of telling them the fried neon story.
I am planning on picking up a Chilton'* tomorrow. Will this have wiring diagrams or is that exclusive to the FSM? If not maybe someone can tell me what color the wire is for the 94. The wire I have already run is 16 ga. I assume this is more than sufficient. And lastly what method did you use to attach your wire to your mystery ground that you found under the center console?
P.*. Thanks bill for telling my sister to tell me to check this out. I actually was browsing this forum and passed it up because it said 96-99...I wouldn't have read it unless she told me to.
07-27-2005, 11:37 PM
#4
DINOSAURUS BOOSTUS
Expert Gearhead
Thread Starter
97 Manual says dark blue wire, 95 manual that should be the same as yours says dark blue wire (and expect the relays in the same positions). I put that check FSM many times to remind people that I put up my particular scenario that should and usually is exactly like theirs, however we must leave the possibility that someone might go for the wire and have a different color. In Bill'* 93 the wire color was green with a white tracer. It'* always good to double check. Maybe all the beer went to my head. 
 07-28-2005, 06:28 AM
#6
DINOSAURUS BOOSTUS
Expert Gearhead
Thread Starter
It was honestly like 1/2 a beer but I had to drink more when I couldn't find parts for my favorite cutting tool and after getting back from Home Depot I was thirsty.
08-06-2005, 02:07 PM
#7
Senior Member
True Car Nut

HELP !!!
I can't seem to find it.. the one @ the bottom is 2nd relay from the right.. the further one is the most right but I can't find it.. and I don't have a blue wire like "Boost gear" .. it'* a 97 SSEI
According to the FSM that "Boost Gear" <-- AKA BillBoost
the low speed is the one all the way to the right most slot and the hi speed is the one beside it.. .. but like Billboost pics I don't have a relay @ the ut most right.. it'* not there.. I checked for ground.. but I get full time power.. help !!! CAR APART RIGHT NOW !!
The one with the lil nic on it.. I tried and tested it.. there'* no ground ( no continuaty ).. and it'* constant hot ( got voltage ).. with AC on and off.. Check the other side ( relay )to see if it got similar colored wires.. and nope... got pissed off waiting.. strip the lil green wire ( on the other relay ).. got the same thing.. full time power ( when car is on.. )
06-03-2010, 02:05 AM
#8
Junior Member
Posts like a V-Tak

Join Date: Aug 2008
Location: Cedar Rapids Iowa
Posts: 29
Likes: 0
Received 0 Likes
on
0 Posts
That big blue wire - I grounded it thinking it was the right thing to do now my fans do not come on with the correct wire grounded & the car is hard to start unless I pump the gas. I should have tested it before grounding it. Can you tell me what I may have damaged please?
06-03-2010, 06:41 AM
#9
DINOSAURUS BOOSTUS
Expert Gearhead
Thread Starter
Not sure which relay that is ... but you grounded a power wire. Please remove that asap. Then check the fuses in the maxifuse center near that relay. Even though they are 60amp or so...it should have blown with a direct short to ground.
The writeup says and shows a connection to a small gauge blue wire. Please...if you have questions ask them. We are here to help and would gladly do so.
The writeup says and shows a connection to a small gauge blue wire. Please...if you have questions ask them. We are here to help and would gladly do so.
06-08-2010, 01:43 AM
#10
Junior Member
Posts like a V-Tak
Join Date: Aug 2008
Location: Cedar Rapids Iowa
Posts: 29
Likes: 0
Received 0 Likes
on
0 Posts
UPDATE! I suspected I did not test the fuses correctly under the steering column, so I looked at 5c again - took it out this time to use my eyes - blown as can be. Now she shifts like she should & the fan override works GREAT! I tried to test the fuses with a volt/ohm meter, my fingers must have been on the test leads completing the circuit and that is why it tested good originally. It really sucked driving when it had to rev at nearly 3k for a full minute to get up to 35mph! Now I am back to chirping the tires.....