95 SLE Transaxle Removal (pix added)
 01-02-2005, 12:01 PM
#1
Senior Member
True Car Nut
Thread Starter


Well, we got a few days of unexpected nice weather this week, so I had to start the trans work before I could get a new lever-type balljoint separator, and sure enough, I tore one of the rubber dust boots with my ol' pickle fork. Fortunately, I learned that I can buy replacement boots at NAPA. I hope they fit OK.
To remove the trans, I used the Chilton'* book covering 86-99 Bonnevilles (28200) as a guide. They recommend that you use an engine hanger to support the engine and remove the left side and front rail "L" section of the subframe to drop the trans. It worked really slick. After separating the left ball joint, the subframe comes apart by removing four bolts at the rear corner, three bolts at the front corner, and three nuts that hold the front trans mount to the front crossmember. That leaves just one big bolt on the LF corner, and the whole piece just drops right out. Once it is out of the way, you have a clear shot to drop the transaxle.
The Chilton'* was helpful, but, as usual not everything applied. I built an engine hanger from 1-1/2" square tubing with 3/16" wall thickness, and 3/16" x 1-1/2" x 1-1/2" angle iron. Materials for the hanger cost about $40. It took longer to design, cut, drill, and assemble the hanger than it did to remove the trans.
Here is what I did. Sizes listed for the bolts are for the heads or nuts, NOT bolt diameter.
Removed engine cover and relay center cover (speed nut)
Removed 8 10mm bolts from radiator cover and top fan supports
Removed hood spring (10mm)
Removed 2 10mm hood latch bolts; relocated latch to clear hanger; left cable attached
Removed strut brace from inner studs (4 x 13mm)
Installed engine hanger
Lifted engine and trans with hanger fixtures about 1/2" to take load off mounts
Disconnected negative battery terminal (5/16")
Unplugged air temp sensor(?), removed airbox and flex pipe (2 x 1/4")
Removed 13mm nuts from cruise control servo and wired up to side
Pried nylon ball joint up off of shift lever ball with needlenose pliers
Removed 13mm studs from shift lever bracket; wired to side
Removed top 3 18mm trans to engine bolts
Unplugged 3 trans electrical connectors: 2 by PCM, 1 by modulator
Removed vacuum line from canister to vacuum modulator and TB; capped open tube ends
Raised car, set jackstands with 2 x 4'* under front floor beams; height at support point 14�
Removed wheels (3/4"), and 3 splash shields from wheel wells (plastic bolts)
Removed big plastic splash shield under radiator (10mm, 5/16")
Removed axle nuts (34mm)
Removed sway bar end links both sides. (chisel, metal cutter, 13mm)
Separated ball joints and lower control arms both sides (18mm, pickle fork or lever tool)
Loosened pan bolts to drain trans fluid (10mm): tightened pan bolts
Removed both half shafts (pry L, wood drift & 4# hammer R)
Removed 4 13mm bolts connecting L cradle rail to Rear crossmember
Removed 3 15mm nuts holding F trans mount to F crossmember
Removed 3 13mm bolts holding F crossmember to R cradle rail (15mm nut)
Undid 1 18mm bolt holding LF corner of cradle member; removed cradle half from car
Disconnected and removed vehicle speed sensor (10mm); plugged hole
Disconnected and removed oil pressure sending unit (special 10-side deep socket)
Disconnected wire from trans to solenoid at starter (5/16")
Centered transmission jack under the center of mass of the transaxle
Lifted the transaxle slightly to remove any remaining pressure on the mounts.
Undid 4 13mm bolts and removed torque mount from trans and rear crossmember
Undid 4 13mm bolts and removed trans to engine bracket (univ attachment)
Removed 3 13mm bolts holding rear mount to trans; mount remained on rear crossmember
Removed flywheel covers (10mm)
Undid 3 13mm bolts attaching F mount to trans, one 18mm bolt into engine; removed F mount
Disconnected cooling lines (5/8" flare), plugged and capped ends, wired out of way
Removed 3 18mm flexplate to TC bolts (held flexplate w/ big screwdriver)
Removed 1 backwards 18mm bolt between engine and trans (11/16" 1/2"- drive 36" ext)
Wiggled trans apart from engine; lowered and moved out until filler tube passed exhaust
Removed filler tube (10mm); lowered trans all the way down on jack
Tilted and slid trans down off jack to ground ; rotated to F; pulled trans out under L wheelwell
The Driver'* side drive axle was rusted into the hub and required some aggressive persuasion to dislodge. I'll be watching and listening closely to see if the hub or CV joints were damaged when I get it back together.
Hardest part of the job was removing the sway bar end links. The sleeve had rusted tightly to the bolt and even though I had cut completely through the sleeve and bolt, the ends would not come out. I eventually got the thing apart with a chisel. I started the other side with a chisel on the split in the sleeve until it was loose from the bolt. Then when the bolt was cut, the ends popped right out.
The "new" trans (21,000 mi) is on the way from Milwaukee.
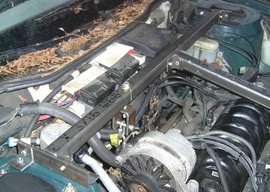
ENGINE HANGER REAR
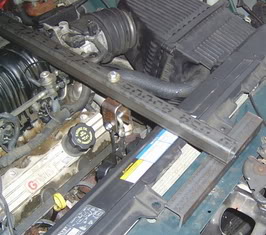
ENGINE HANGER FRONT
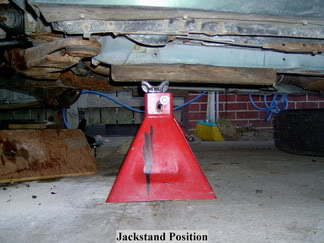
JACKSTAND POSITION
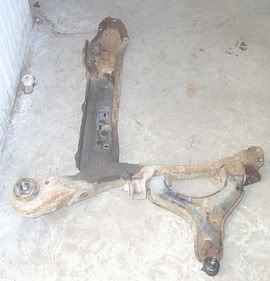
SUBFRAME HALF

REMOVE OIL PRESSURE SENDER

LONG EXTENSION GOES IN HERE
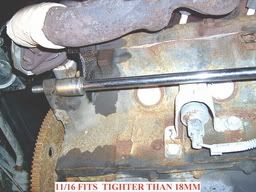
LOCATION OF BACKWARDS BOLT
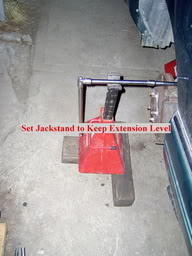
KEEP EXTENSION LEVEL
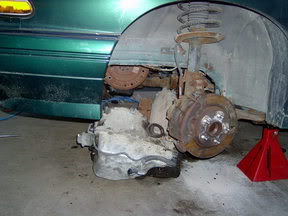
TRANS OUT
To remove the trans, I used the Chilton'* book covering 86-99 Bonnevilles (28200) as a guide. They recommend that you use an engine hanger to support the engine and remove the left side and front rail "L" section of the subframe to drop the trans. It worked really slick. After separating the left ball joint, the subframe comes apart by removing four bolts at the rear corner, three bolts at the front corner, and three nuts that hold the front trans mount to the front crossmember. That leaves just one big bolt on the LF corner, and the whole piece just drops right out. Once it is out of the way, you have a clear shot to drop the transaxle.
The Chilton'* was helpful, but, as usual not everything applied. I built an engine hanger from 1-1/2" square tubing with 3/16" wall thickness, and 3/16" x 1-1/2" x 1-1/2" angle iron. Materials for the hanger cost about $40. It took longer to design, cut, drill, and assemble the hanger than it did to remove the trans.
Here is what I did. Sizes listed for the bolts are for the heads or nuts, NOT bolt diameter.
Removed engine cover and relay center cover (speed nut)
Removed 8 10mm bolts from radiator cover and top fan supports
Removed hood spring (10mm)
Removed 2 10mm hood latch bolts; relocated latch to clear hanger; left cable attached
Removed strut brace from inner studs (4 x 13mm)
Installed engine hanger
Lifted engine and trans with hanger fixtures about 1/2" to take load off mounts
Disconnected negative battery terminal (5/16")
Unplugged air temp sensor(?), removed airbox and flex pipe (2 x 1/4")
Removed 13mm nuts from cruise control servo and wired up to side
Pried nylon ball joint up off of shift lever ball with needlenose pliers
Removed 13mm studs from shift lever bracket; wired to side
Removed top 3 18mm trans to engine bolts
Unplugged 3 trans electrical connectors: 2 by PCM, 1 by modulator
Removed vacuum line from canister to vacuum modulator and TB; capped open tube ends
Raised car, set jackstands with 2 x 4'* under front floor beams; height at support point 14�
Removed wheels (3/4"), and 3 splash shields from wheel wells (plastic bolts)
Removed big plastic splash shield under radiator (10mm, 5/16")
Removed axle nuts (34mm)
Removed sway bar end links both sides. (chisel, metal cutter, 13mm)
Separated ball joints and lower control arms both sides (18mm, pickle fork or lever tool)
Loosened pan bolts to drain trans fluid (10mm): tightened pan bolts
Removed both half shafts (pry L, wood drift & 4# hammer R)
Removed 4 13mm bolts connecting L cradle rail to Rear crossmember
Removed 3 15mm nuts holding F trans mount to F crossmember
Removed 3 13mm bolts holding F crossmember to R cradle rail (15mm nut)
Undid 1 18mm bolt holding LF corner of cradle member; removed cradle half from car
Disconnected and removed vehicle speed sensor (10mm); plugged hole
Disconnected and removed oil pressure sending unit (special 10-side deep socket)
Disconnected wire from trans to solenoid at starter (5/16")
Centered transmission jack under the center of mass of the transaxle
Lifted the transaxle slightly to remove any remaining pressure on the mounts.
Undid 4 13mm bolts and removed torque mount from trans and rear crossmember
Undid 4 13mm bolts and removed trans to engine bracket (univ attachment)
Removed 3 13mm bolts holding rear mount to trans; mount remained on rear crossmember
Removed flywheel covers (10mm)
Undid 3 13mm bolts attaching F mount to trans, one 18mm bolt into engine; removed F mount
Disconnected cooling lines (5/8" flare), plugged and capped ends, wired out of way
Removed 3 18mm flexplate to TC bolts (held flexplate w/ big screwdriver)
Removed 1 backwards 18mm bolt between engine and trans (11/16" 1/2"- drive 36" ext)
Wiggled trans apart from engine; lowered and moved out until filler tube passed exhaust
Removed filler tube (10mm); lowered trans all the way down on jack
Tilted and slid trans down off jack to ground ; rotated to F; pulled trans out under L wheelwell
The Driver'* side drive axle was rusted into the hub and required some aggressive persuasion to dislodge. I'll be watching and listening closely to see if the hub or CV joints were damaged when I get it back together.
Hardest part of the job was removing the sway bar end links. The sleeve had rusted tightly to the bolt and even though I had cut completely through the sleeve and bolt, the ends would not come out. I eventually got the thing apart with a chisel. I started the other side with a chisel on the split in the sleeve until it was loose from the bolt. Then when the bolt was cut, the ends popped right out.
The "new" trans (21,000 mi) is on the way from Milwaukee.
ENGINE HANGER REAR
ENGINE HANGER FRONT
JACKSTAND POSITION
SUBFRAME HALF
REMOVE OIL PRESSURE SENDER
LONG EXTENSION GOES IN HERE
LOCATION OF BACKWARDS BOLT
KEEP EXTENSION LEVEL
TRANS OUT
 01-02-2005, 12:21 PM
#2
Senior Member
True Car Nut

Simply fantastic write-up, Bill.  Thanks for taking the time to post and include the pics.
That engine hanger is very sweet, too. I'm going to need something just like that in the spring.
Thanks for taking the time to post and include the pics. That engine hanger is very sweet, too. I'm going to need something just like that in the spring.
01-02-2005, 12:32 PM
#3
Junior Member
Posts like a Ricer Type-R

I could use that hanger NOW. What'* shipping from IA? 
I may have to weld one up, but I was thinking of 2x8'* on edge instead. May just pay to have it swapped too.
Hell, I don't know.
I may have to weld one up, but I was thinking of 2x8'* on edge instead. May just pay to have it swapped too.
Hell, I don't know.
01-02-2005, 03:18 PM
#4
Senior Member
True Car Nut
Thread Starter
Thanks, Randy. You are most welcome to borrow the hanger anytime you need it. 
Willwren, if you can get it back to me before Randy needs it this spring, you are welcome to use it first. As long as I get it back when I need it, (hopefully, not for a while) I'll be happy. I hope to be done with it at the end of the first nice day (40F) after I get the trans. Trans is supposed to be here tomorrow. If it turns out to be too expensive to ship back and forth, I can also post the dimensions to build one. There are no welds in the design; all is held together with grade 8 bolts, so the whole thing can be disassembled into an easily stored or shipped package. It is kinda' heavy, though, maybe 15-20 pounds. The package size would be about 40" long by 2" square.
Willwren, I don't know your zip, but from 50010 (Ames) to 97201 (Portland) Fedex will ship 20lb for $18.
http://www.fedex.com/ratefinder/home?cc=US&language=en
I'm just guessing at the weight, so it may cost a little more or less to ship it.
Maybe there is a cheaper way to ship?


Thread
Thread Starter
Forum
Replies
Last Post
gm4life
Your Ride: GM Pictures & Videos
16
08-04-2005 11:11 AM