95 SLE Transaxle installation
 01-22-2005, 04:01 PM
#1
Senior Member
True Car Nut
Thread Starter


The "new" trans is in and so far, seems to be working swell. I wanted to post some pix and let you all know how I got this done. (This may not be the best way, but it worked for me!)
Thanks to Jr's3800 and mkaake for helping solve some problems along the way.
For the first part of this story (trans removal) go here:
http://bonnevilleclub.com/forum/view...558&highlight=
Here'* what I did to install:
Checked ID tag to make sure new trans model, type, matched old
Checked ID tag on new torque converter to match old (first 4 characters)
Removed TC holding fixture, removed and drained torque converter
Positioned trans to gain access to pan and filter
Removed and cleaned pan, magnet and bolts
Cleaned and plugged rubber seal for dipstick tube
Checked orientation of thermal element: V point up against flat (thanks mkaake)
Installed new filter and gasket; torqued pan bolts to a few ft-lbs
Removed old pump seal by puncturing w/ screwdriver from slot in bottom of bell housing
Cleaned seal seating area
Seated new seal with 10" length of 3" schedule 40 PVC pipe, 2# hammer
Seated torque converter (spin and push); installed holding fixture
Cleaned and inspected drive shaft seals; kept dirt out of trans
Swapped neutral safety switch, shift lever, vss
Blew out cooler lines with dry air (in rad bottom, out top)
Cut fitting from cooler flush hose, heated hose to fit over cooler line
Flushed cooler lines with aerosol solvent
Blew cooler lines with dry air
Slid trans under car approximately in position
Rocked and blocked trans 5" high with 3, 1' 2x6s under pan edge
Placed low scissors jack with 1' 1x4 under trans CG (center of gravity)
Jacked and blocked high enough to place floor jack w/ board under CG
Removed torque converter holding fixture
Jacked trans into position
Inserted dipstick/fill tube into hole (left plug in 'til inserting)
Wiggled trans onto dowel pins, left jack in place until mounts were done
Inserted top 3 18mm bolts finger tight in bell housing
Installed 18mm backwards bolt into bell housing
Tightened other 18mm bell housing bolts exc. front mount
Installed 13mm rear mount bolts into trans
Installed nuts onto rear mount bolts through rear crossmember
Started all 13mm bolts in trans/engine bracket;
tightened engine bracket bolts first;
tightened trans bracket bolts last
Installed oil sender with thread sealant
Made elec connections to senders and to vss
Connected solenoid wire to starter (5/16)
Connected coolant lines to trans (5/8 flare)
Installed torque converter bolts w 11/16" offset box wrench
Installed flywheel covers (10mm)
Installed torque strut mount to rear crossmember, then to trans
Placed front mount in position on front crossmember of cradle half
Placed cradle half in position: RF, LR, then started LF bolt to hold
Installed 4 13mm bolts in LR corner (long one in bar bushing)
Installed 3 13mm bolts and one nut in RF corner
Tightened 18mm LF bolt
Fastened front mount with cooling line holder to trans and engine
Installed clamp to hold cooler lines in place
Installed drive axles; pinned rotor slot against caliper to tighten big nut
Assembled ball joints, cotter pins
Installed end links; jacked under bar or ball joint as needed
Installed wheel well shields, road wheels, big front splash shield
Lowered car to ground
Installed vacuum lines to vacuum modulator, vapor canister, both throttle body vacuum taps and fuel pressure regulator
Made 3 elec connections on top of trans
Installed shift lever bracket with 13mm studs
Installed ball end of shift cable; heated nylon 'cuz it was cold
Installed cruise servo with 13mm nuts
Installed airbox and flex pipe
Plugged in air temp sensor
Connected battery cable
Removed engine hanger
Installed strut brace, hood latch, and spring
Installed rad cover and top fan support bolts
Installed fuel line retainer, relay center cover
Filled trans, (21 pts for drained used trans and TC) checked for leaks
Started engine, checked for leaks
Checked shift positions for neutral, and park start
Shifted to each position; checked function; checked fluid
Installed engine cover
Test drove
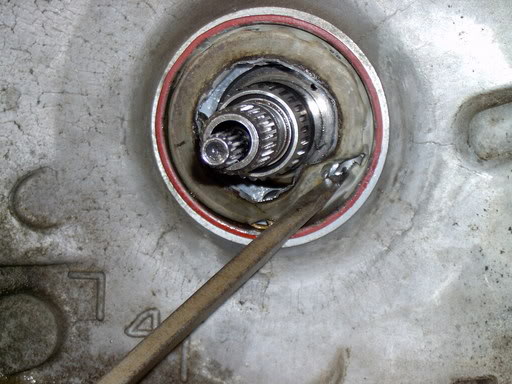
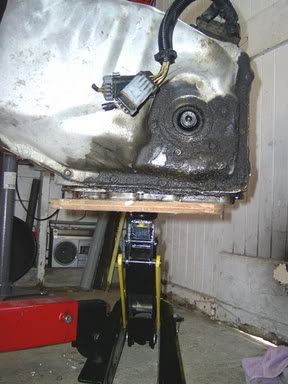
Removed old pump seal behind torque converter Slide hammer - no Screwdriver - yes
Looked like this when seal was out
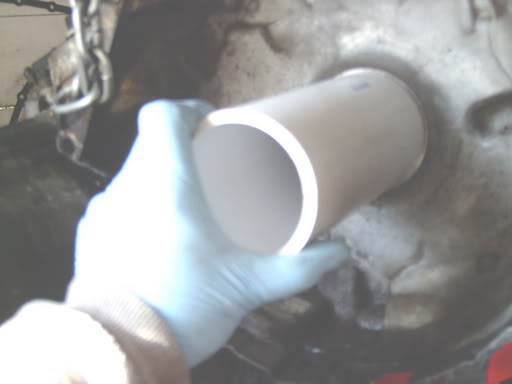
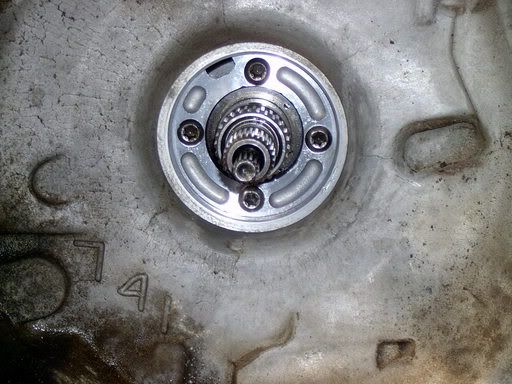
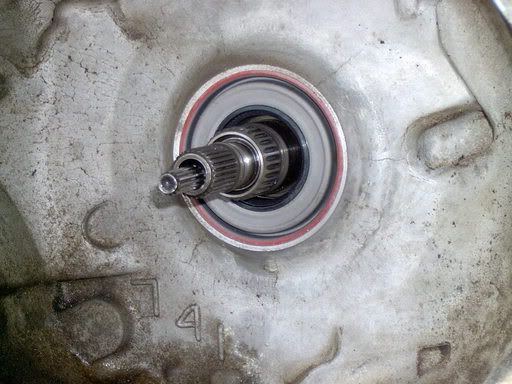
Drove new seal in with 3" PVC pipe and 2-pound hammer

New seal in
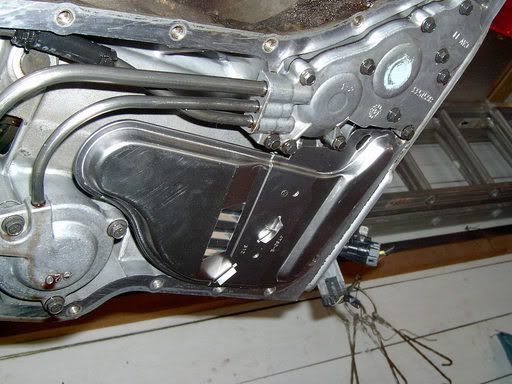
Cleaned gasket surface, pan and installed new filter
Held torque converter in place with simple steel strap
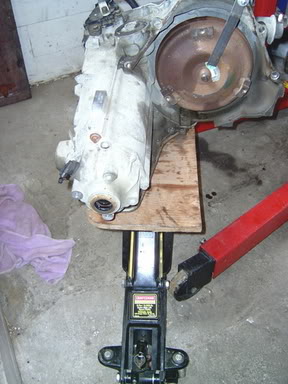
Balance point side to side
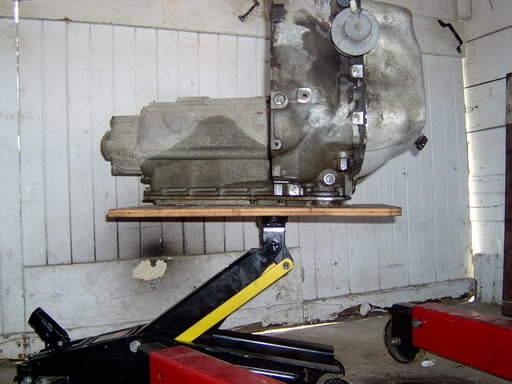
Balance point front to back
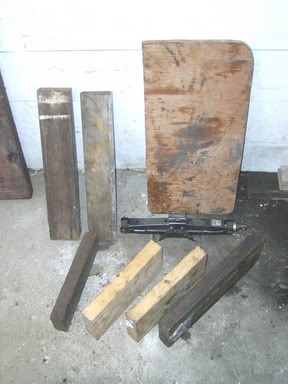
Jack and blocks
and finally, some notes:
Engine hangers can be purchased for about $200. Some places rent them (but not in my town) or you can build one. Plans with drawings are here: http://www.bonnevilleclub.com/forum/...=306016#306016
I used an engine hoist to lift the trans with a chain installed using bolts tightened near the balance point. It may be OK to just roll the trans on its side to change the filter and clean the pan. (?)
I had to be pretty aggressive with the old pump seal to get it out. It was necessary to distort and destroy the old seal to remove it. I used a heavy screwdriver with a pretty sharp tip - kept the angle of the screwdriver low to the face of the seal so as not to hit any of the shafts or the case. There is about a half-inch of space behind the seal. Got the new seal started and used the PVC pipe to drive it in. Kept the pipe in contact with the full face of the seal and struck the other end of the pipe where the seal was out the most - had to hit it pretty hard to get it to seat.
My replacement trans had a longer shift lever than the original (column shift, maybe?). Held the lever with a big Crescent wrench when doing and undoing the nut. I changed the lever for the old one and also used the old neutral switch because the wiring looked better. I positioned the old switch on the new trans using the marks on the switch from the mounting nuts as a guide.
The fitting on the end of the vinyl hose on the aerosol can of cooler flush was way too small for the trans cooling line. I cut off the fitting. The i.d. of the vinyl hose was about 1/4" and the o.d. of the flared end of the steel cooling line was about 1/2" By heating the end of the vinyl hose with a heat gun and spreading it over the cone shaped nozzle on my engine cleaner wand, I was able to get it big enough to start and stretch over the bigger diameter flare on the cooling line to make a good seal.
I tilted and blocked the trans under the car until I could get a little scissors jack and board underneath it. The jack was from an old Mustang - it is only about 4" high when all the way down. I used this jacking and blocking method because I was unable to lift the trans onto the floor jack and plywood board when it was under the car.
When lifting the transaxle, I used a board on top of the jack to distribute the weight so I didn't dent the pan. I kept the jack under the trans until all the mounts were in place and could safely hold the weight of the trans without distorting or stressing the trans case. I spun the jack as needed to get better access as I worked, but didn�t release it until all the mounts were tight.
With the torque converter in place, the balance point end to end is at the face where the bell housing attaches to the engine, the balance point front to back is best judged by looking at the trans from the driver�* side.
I should have installed the front mount on the front crossmember BEFORE I installed the cradle half. Would have saved me a half-hour taking it back down to do it.
Tightened the vehicle speed sensor and dipstick tube holddown bolts from the top of the engine by lying on the engine.
When filling the transaxle, I put about two gallons in, then started the car, then added a pint at a time, checking the level frequently until the level was correct. It took a little more than 2-1/2 gallons to fill.
Thanks to Jr's3800 and mkaake for helping solve some problems along the way.
For the first part of this story (trans removal) go here:
http://bonnevilleclub.com/forum/view...558&highlight=
Here'* what I did to install:
Checked ID tag to make sure new trans model, type, matched old
Checked ID tag on new torque converter to match old (first 4 characters)
Removed TC holding fixture, removed and drained torque converter
Positioned trans to gain access to pan and filter
Removed and cleaned pan, magnet and bolts
Cleaned and plugged rubber seal for dipstick tube
Checked orientation of thermal element: V point up against flat (thanks mkaake)
Installed new filter and gasket; torqued pan bolts to a few ft-lbs
Removed old pump seal by puncturing w/ screwdriver from slot in bottom of bell housing
Cleaned seal seating area
Seated new seal with 10" length of 3" schedule 40 PVC pipe, 2# hammer
Seated torque converter (spin and push); installed holding fixture
Cleaned and inspected drive shaft seals; kept dirt out of trans
Swapped neutral safety switch, shift lever, vss
Blew out cooler lines with dry air (in rad bottom, out top)
Cut fitting from cooler flush hose, heated hose to fit over cooler line
Flushed cooler lines with aerosol solvent
Blew cooler lines with dry air
Slid trans under car approximately in position
Rocked and blocked trans 5" high with 3, 1' 2x6s under pan edge
Placed low scissors jack with 1' 1x4 under trans CG (center of gravity)
Jacked and blocked high enough to place floor jack w/ board under CG
Removed torque converter holding fixture
Jacked trans into position
Inserted dipstick/fill tube into hole (left plug in 'til inserting)
Wiggled trans onto dowel pins, left jack in place until mounts were done
Inserted top 3 18mm bolts finger tight in bell housing
Installed 18mm backwards bolt into bell housing
Tightened other 18mm bell housing bolts exc. front mount
Installed 13mm rear mount bolts into trans
Installed nuts onto rear mount bolts through rear crossmember
Started all 13mm bolts in trans/engine bracket;
tightened engine bracket bolts first;
tightened trans bracket bolts last
Installed oil sender with thread sealant
Made elec connections to senders and to vss
Connected solenoid wire to starter (5/16)
Connected coolant lines to trans (5/8 flare)
Installed torque converter bolts w 11/16" offset box wrench
Installed flywheel covers (10mm)
Installed torque strut mount to rear crossmember, then to trans
Placed front mount in position on front crossmember of cradle half
Placed cradle half in position: RF, LR, then started LF bolt to hold
Installed 4 13mm bolts in LR corner (long one in bar bushing)
Installed 3 13mm bolts and one nut in RF corner
Tightened 18mm LF bolt
Fastened front mount with cooling line holder to trans and engine
Installed clamp to hold cooler lines in place
Installed drive axles; pinned rotor slot against caliper to tighten big nut
Assembled ball joints, cotter pins
Installed end links; jacked under bar or ball joint as needed
Installed wheel well shields, road wheels, big front splash shield
Lowered car to ground
Installed vacuum lines to vacuum modulator, vapor canister, both throttle body vacuum taps and fuel pressure regulator
Made 3 elec connections on top of trans
Installed shift lever bracket with 13mm studs
Installed ball end of shift cable; heated nylon 'cuz it was cold
Installed cruise servo with 13mm nuts
Installed airbox and flex pipe
Plugged in air temp sensor
Connected battery cable
Removed engine hanger
Installed strut brace, hood latch, and spring
Installed rad cover and top fan support bolts
Installed fuel line retainer, relay center cover
Filled trans, (21 pts for drained used trans and TC) checked for leaks
Started engine, checked for leaks
Checked shift positions for neutral, and park start
Shifted to each position; checked function; checked fluid
Installed engine cover
Test drove
Removed old pump seal behind torque converter Slide hammer - no Screwdriver - yes
Looked like this when seal was out
Drove new seal in with 3" PVC pipe and 2-pound hammer
New seal in
Cleaned gasket surface, pan and installed new filter
Held torque converter in place with simple steel strap
Balance point side to side
Balance point front to back
Jack and blocks
and finally, some notes:
Engine hangers can be purchased for about $200. Some places rent them (but not in my town) or you can build one. Plans with drawings are here: http://www.bonnevilleclub.com/forum/...=306016#306016
I used an engine hoist to lift the trans with a chain installed using bolts tightened near the balance point. It may be OK to just roll the trans on its side to change the filter and clean the pan. (?)
I had to be pretty aggressive with the old pump seal to get it out. It was necessary to distort and destroy the old seal to remove it. I used a heavy screwdriver with a pretty sharp tip - kept the angle of the screwdriver low to the face of the seal so as not to hit any of the shafts or the case. There is about a half-inch of space behind the seal. Got the new seal started and used the PVC pipe to drive it in. Kept the pipe in contact with the full face of the seal and struck the other end of the pipe where the seal was out the most - had to hit it pretty hard to get it to seat.
My replacement trans had a longer shift lever than the original (column shift, maybe?). Held the lever with a big Crescent wrench when doing and undoing the nut. I changed the lever for the old one and also used the old neutral switch because the wiring looked better. I positioned the old switch on the new trans using the marks on the switch from the mounting nuts as a guide.
The fitting on the end of the vinyl hose on the aerosol can of cooler flush was way too small for the trans cooling line. I cut off the fitting. The i.d. of the vinyl hose was about 1/4" and the o.d. of the flared end of the steel cooling line was about 1/2" By heating the end of the vinyl hose with a heat gun and spreading it over the cone shaped nozzle on my engine cleaner wand, I was able to get it big enough to start and stretch over the bigger diameter flare on the cooling line to make a good seal.
I tilted and blocked the trans under the car until I could get a little scissors jack and board underneath it. The jack was from an old Mustang - it is only about 4" high when all the way down. I used this jacking and blocking method because I was unable to lift the trans onto the floor jack and plywood board when it was under the car.
When lifting the transaxle, I used a board on top of the jack to distribute the weight so I didn't dent the pan. I kept the jack under the trans until all the mounts were in place and could safely hold the weight of the trans without distorting or stressing the trans case. I spun the jack as needed to get better access as I worked, but didn�t release it until all the mounts were tight.
With the torque converter in place, the balance point end to end is at the face where the bell housing attaches to the engine, the balance point front to back is best judged by looking at the trans from the driver�* side.
I should have installed the front mount on the front crossmember BEFORE I installed the cradle half. Would have saved me a half-hour taking it back down to do it.
Tightened the vehicle speed sensor and dipstick tube holddown bolts from the top of the engine by lying on the engine.
When filling the transaxle, I put about two gallons in, then started the car, then added a pint at a time, checking the level frequently until the level was correct. It took a little more than 2-1/2 gallons to fill.

 01-24-2005, 07:48 AM
#4
Senior Member
Posts like a Camaro

Originally Posted by bill buttermore
New seal in
Cleaned gasket surface, pan and installed new filter
ohhh, that'* nice. very nice job on the install - sounds like you did it up right. glad you got the right tranny this time!
01-24-2005, 10:50 AM
#5
Senior Member
True Car Nut
Thread Starter
Thanks. Yeah, I'm not real bright, but I can still learn. When I called this junkyard, I asked them to read me the ID tag (didn't give my numbers) before I agreed to purchase. When I heard 5BXW, I figured we were good to go.
Thanks again, mkaake, for your help.
Thanks again, mkaake, for your help.

Thread
Thread Starter
Forum
Replies
Last Post

